
Skype is the most popular and oldest communication tool, especially for video calling purposes. It offers both professional and personal services. Over time, we have various platforms to communicate with our friends and families with various advanced features. We may want to delete a Skype account for multiple reasons. But it doesn’t offer dedicated delete or remove button to finish the process. It will take a series of steps to delete a Skype account. Moreover, it will take 30-60 days to delete the account permanently. All the related details are discussed in detail. Follow along to know more.
Delete a Skype Account
The series of steps you need to carry out to delete a Skype account is as follows.
- Unlink the Microsoft account from your Skype Account
- Cancel all active subscriptions and request a refund if eligible
- Cancel the Skype number if you have
- Disable Auto-Renew feature to stop recurring payments
- Remove all your personal details
- Delete your Profile Picture
- Set your status to Offline or invisible
- Sign out of Skype on all the devices
- Remover all other info
- Delete a Skype Account
It will take around 30-60 days to delete the account permanently. Once after deleting the account, you will not be able to use the same username again. Remember, if you log in to the account before the permanent deletion, you may use the account. But after the end of 60 days, you may not be able to use the account at any cost.
1. Preliminary Steps
1.1 Unlink the Microsoft Account from your Skype Account
Step 1: On any web browser, go to the Skype website. Sign in to your account with the necessary details.
Step 2: Scroll down to the bottom of the screen and click Account Settings. You can find this option in the Settings and Preferences Section.
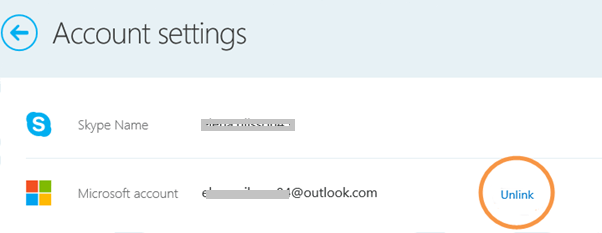
Step 3: There, click Unlink next to the Microsoft account. If you find the “Not linked” option, it means the accounts aren’t linked, and you can proceed to the next step.
Step 4: Click Confirm to confirm the unlink.
Remember: If your account name looks live: (Email ID without domain address) or Outlook:(Email ID without domain address) after unlinking, you may lose all the Microsoft contacts.
1.2 Cancel for All Active Subscriptions and Request Refund if Eligible
Step 1: On any web browser, go to the Skype site. Sign in to your account.
Step 2: Scroll down to the bottom of the screen and click Account Settings. You can find this in the Settings and Preferences Section.
Step 3: Select the subscription or the recurring payments you want to cancel.
Step 4: Now click Cancel Subscription. And then tap “Thanks but no thanks, I still want to Cancel.“
You can even request the refund of the unused Skype subscriptions in the Live chatbot or by filling the Refund requisition form.
1.3 Cancel the Skype Number (if you have)
If you have purchased any Skype number, you may cancel it with the following steps.
Step 1: On any web browser, go to Skype’s official site. Log in to your account.
Step 2: Go to the Manage Feature section. Click on the Skype Number option.
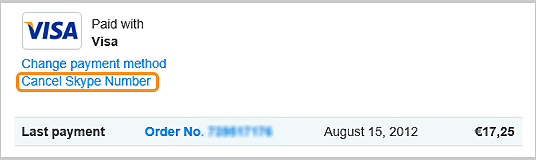
Step 3: Now choose Settings. And click on the Cancel Skype Number option.
The Skype number will be active until the permanent deleting of the account for up to 90 days.
1.4 Disable Auto-Renew feature to Stop Recurring Payments
If you are using any Auto-renewal option, you need to disable it to prevent money from being debited from your account by Skype.
Step 1: On any web browser, go to the Skype site and sign in to your account.
Step 2: Scroll down to the bottom of the screen, click on the Account Details section.
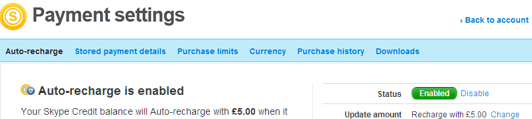
Step 3: Now click on the Billing and Payment. Select Disable near the Auto-recharge tab.
Note: Skype subscriptions are totally different from the auto-renewal option. So don’t confuse.
You can now very well request the deletion by contacting Skype Customer care. But you need to be careful with your personal details, so remove all the personal info beforehand.
Related: How to Cancel HBO Now Subscription
Remove all your Personal Details
2.1 Remove Profile Picture
Step 1: Click on your Profile Picture.
Step 2: Then choose Remove Profile picture.
2.2 Set your Status to Offline or invisible
It is like updating the status to your contacts to know that you have left Skype.
Step 1: Go to your Profile info section.
Step 2: Update your Mood status. Make it polite and let the contacts know where they can contact your further.
Step 3: Change your status to Offline or invisible.
2.3 Sign Out of Skype on all the devices
You need to sign out of Skype from all the devices you have logged with that particular account. It can be your Android or iOS smartphones or tablets, computers, etc.
2.4 Remove all other Personal Details
Follow the steps to delete all other info.
Step 1: On any web browser, go to Skype’s official site. Sign in to your account.
Step 2: Scroll down to click Edit Profile. You can find this in the Settings and Preferences Section.
Step 3: Click Edit in the Personal Information section. Then remove all the identifiable information from the Personal Information and Contact Details sections.
3. Delete a Skype Account
3.1 Delete Account on Application – Computer
You can delete a Skype Account on your Mac or Windows computer application. Unfortunately, you cannot delete the account in the Skype app on your smartphone.
Step 1: Open the Skype app on your Mac or Windows PC. Tap the Skype logo on the top-left corner of the screen.
Step 2: Now choose the Settings option on the pop-up menu.
Step 3: Then choose Account and Profile on the left pane.
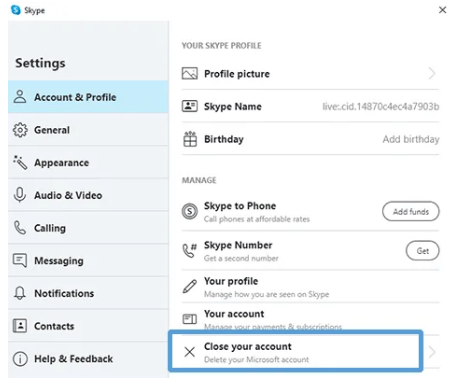
Step 4: Now click on the Close your account.

Step 5: Enter your Microsoft ID and password. Then click Next.
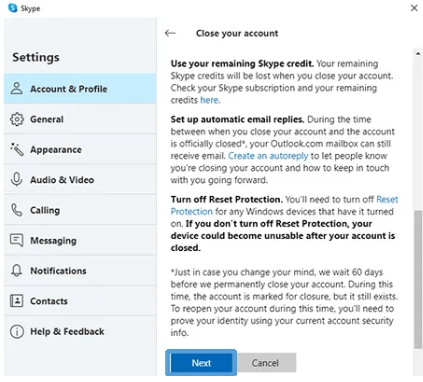
Step 6: Read the contents. Then you should click on the Next option.
Step 7: Check in the boxes on the next screen. Now choose a reason for closing the account.
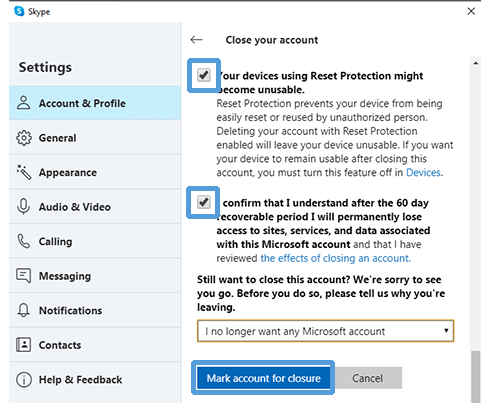
Step 8: Click the Mark account for closure button.
Related: 3 Different Ways to Use Skype on Chromebook
3.2 In Skype Website

Step 1: On any web browser, go to https://www.skype.com/en.
Step 2: And log in with your account credentials. Choose My Account from the Menu.
Step 3: Select the Edit Profile option. You can find it on the Settings and Preferences on the left pane.
Step 4: Now uncheck the box near Appear in Search results and suggestions on the Discoverability column. Save the changes.
The deleting part of Skype is a bit dragging and also tedious. In case of any queries, you shall reach us through the comment section below.