
Google’s Chromebooks are simple laptops that run on Chromium OS and uses the Google Chrome web browser as the interface. Adding a printer to Chromebook is so simple. It just takes a few steps, and you can quickly print your documents from your Chromebook. You can easily add a wireless printer over a Wi-Fi network or use the cable to connect the printers to your Chromebook. Either of the methods will help you print the document on the go. And let us proceed to the procedure on how to Add a Printer to Chromebook right on this gui
Add Printer to Chromebook
As far as wired printers are concerned, you can refer to the printer manual for the setup instructions. You can make use of a USB cable to connect the printer to your Chromebook. And follow the screen instructions as such to complete the setup.
To print wirelessly, you don’t have to connect your printer to Wi-Fi if it is connected to Chromebook.
Note: Chromebook doesn’t support printing over Bluetooth.
Steps to Add Printer to Chromebook
Step 1: Turn on your printer and connect it to the Wi-Fi network. (There are various brands and models of printers so you can refer to the manual to set it up.
Step 2: Now click on the time on the bottom-right corner of the screen.
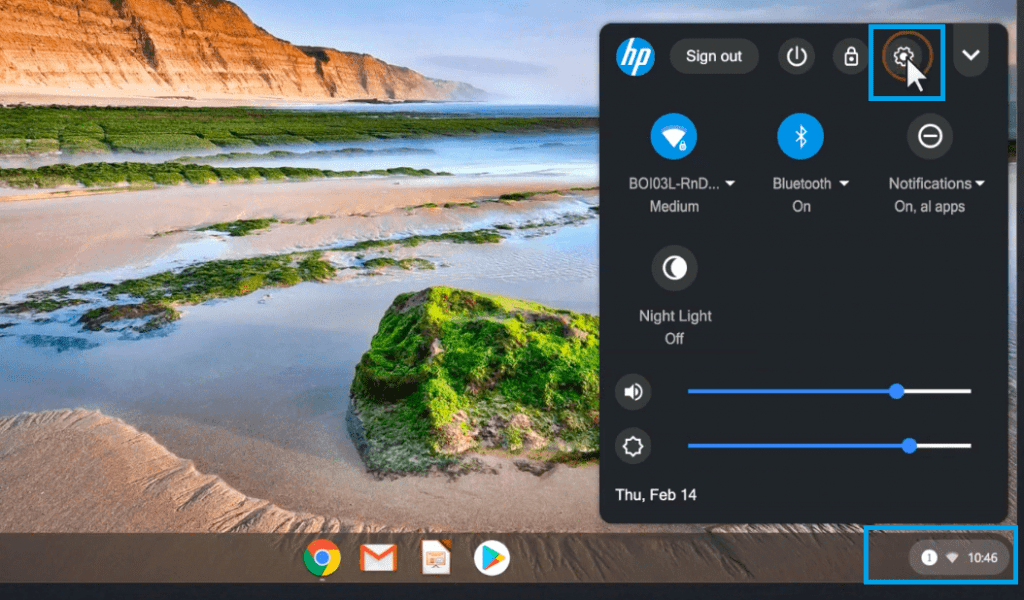
Step 3: Choose Settings from the pop-up window. The gear-shaped icon.

Step 4: Navigate to the bottom of the Chromebook screen. Then choose Advanced. You can find Advanced on the left pane too.

Step 5: Now choose Printing from the left pane. Then select Printers.
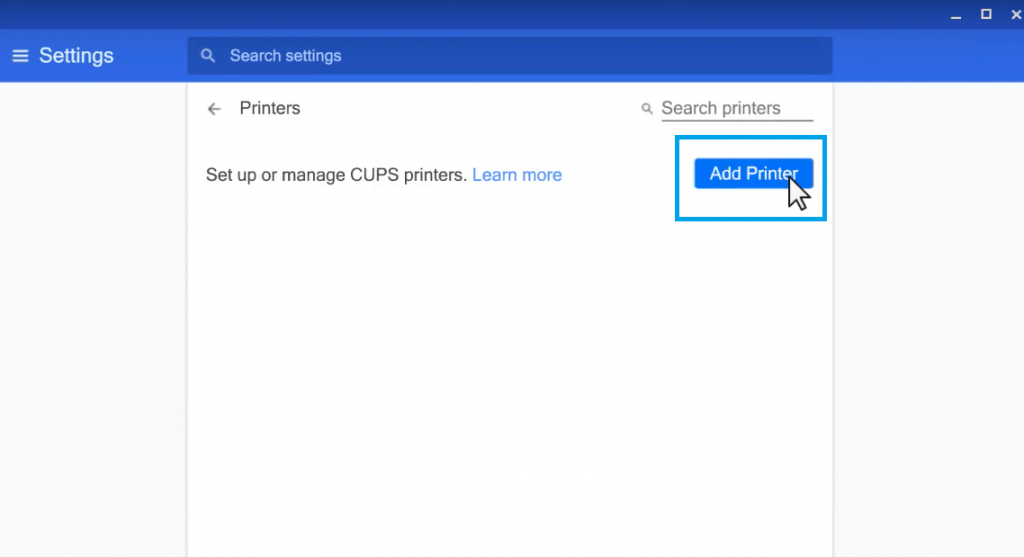
Step 6: To add printer manually, select Add printer next to Add printer option. Then, enter printer info like printer name, IP address, protocol, queue, etc. Press Add.
- When the printer has a Wi-Fi connection, you will see your Printer under Available printers to save. Select Save.
Check whether your printer is available on the Saved printers.
Related: How to copy and paste on Chromebook
How to Print on Chromebook?
Step 1: Just open the document or any pages or webpages you want to print on your Chromebook.
Step 2: And press Ctrl+P keys on the keyboard. Or click on the printer shaped icon on the screen.
Step 3: Choose the Destination dropdown menu. Then choose See More.
Step 4: Select the desired printer. If your printer isn’t available, choose Manage. Add the printer.
Step 5: Click Print. Make sure all your basic settings are accurate.
Troubleshooting Issues
The printer wouldn’t print: Click on time in the bottom right corner. Settings >> Advanced >> Printing >> Printer. Choose your printer and click More. Then choose Edit. Make sure that all the printer info is correct without typos. Try Removing the printer and add it again.
Not connecting to Wi-Fi: Turn off the printer and turn it on again. Or check the user manual for more information.
Advance Setup process: Click on Setup next to the printer name. Choose your printer manufacturer and model in the box. Click Add and then check whether the printer is available under Saved Printers.
Postscript Printer Description: Chromebooks support PPD files to support printers. It is different from printer drivers, and it tells your Chromebook how to support a specific printer model. Select Browse that appears next to “Or specify your Printer PPD.” Choose your printer’s PPD and click Open.
Add Printers Manually: It is the same as that of adding printers. Just follow the above-mentioned steps. Enter all your printer information manually, like name, address, protocol (IPP), queue(IPP/print). Click Add.
Check whether your printer is compatible with the Chromebook by visiting the support page of the Chromebook.
That was all about adding printers and printing on Chromebook. Still, got queries? You could write us in the comment section below.