
While writing a document, we will concentrate on the presentation aspect more. Typing your contents as a para may not impress the readers. There comes an option called Bulletin that allows users to edit texts point by point. Bullets are mainly used to write point by point or to list something out. MS Word and other word processing software will have an inbuilt bullet icon on the menu bar. But for those who are using something different like a notepad, the option might not be available. If you are a Windows user, then you might find it difficult to make a bullet point on Mac. Here are the shortcuts and other techniques to make a bullet point on your Mac.
How to Make a bullet point on Mac?
There are more than a way to create a bulletin on your Mac. You can either use shortcut keys or character viewer to add bullets. You can also copy paste from another document as well. Let us see the different ways to make a bullet point on Mac.
Those are using Shortcut keys. using character viewer or copying and pasting from another document. We will discuss all three ways in detail.
Shortcut key
The simplest and quickest way to insert a bullet point is to use a keyboard shortcut. You just need to press two keys simultaneously to add bullets.
- Open the document on which you want to create the bullet list.
- Place the cursor on the document.
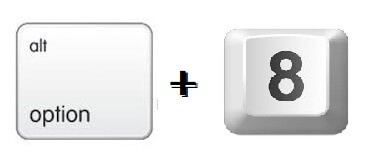
- Press the Options (Alt) + 8 key on the keyboard and type the text.
- To go to the next bullet point press the enter.
How to Make a bullet point on Mac in Various apps?
Few apps on your Mac comes with the built-in bullet feature. You can access it from the Menu bar. Here are the apps which have an inbuilt bulletin option.
1. Text Edit

- Place the cursor on the place you would like to make a bullet.
- On the right corner of the app’s toolbar, you can see a drop-down menu. Click on it.
- You can find various types of bullet options.
- Select the one you want and start making the list.
2. Pages
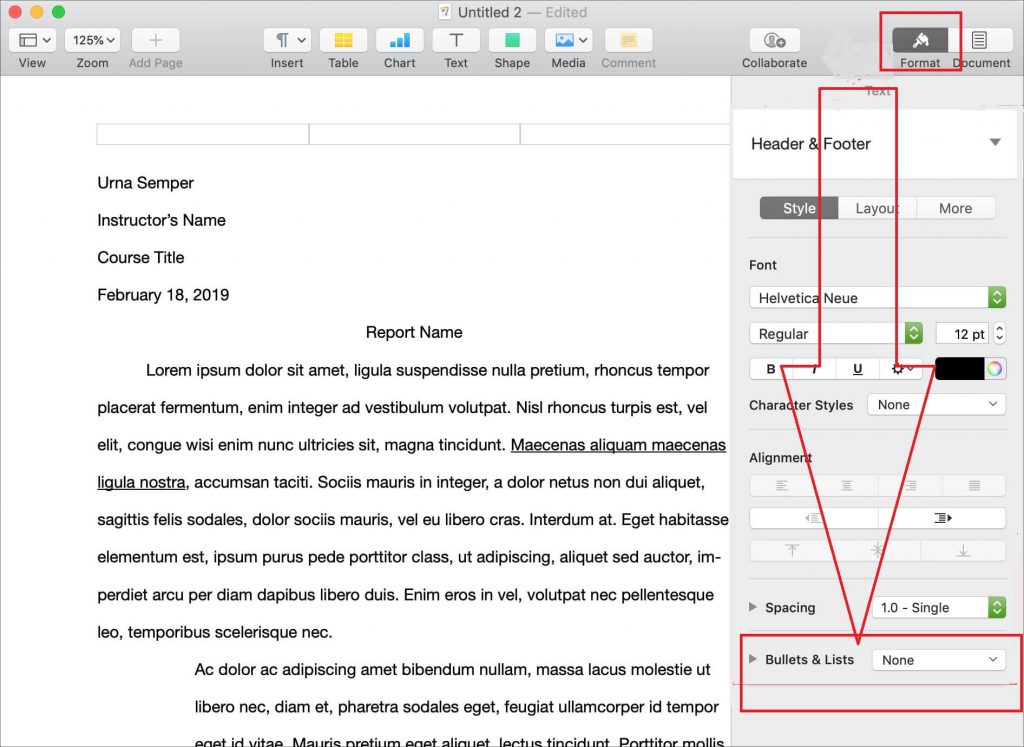
- This app has a text formatting bar on the top.
- Click the Bullets and Lists in the bar.
- A list of options will appear. Choose the one you want.
- You have also got options to change the indents, bullet colors, and sizes.
3. Notes

- You can find a Format on the Menu bar.
- Click on it and choose the one you want.
- You can also right-click on the Notes screen to get the options.
- Choose the paragraph style you want.
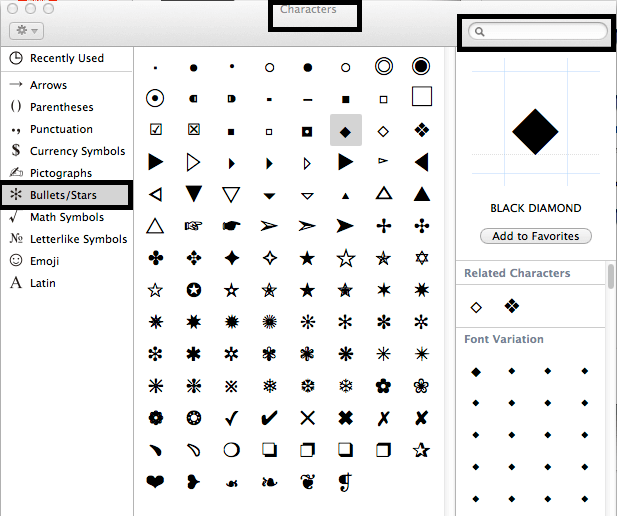
How to Make a bullet point on Mac via Character Viewer?

- Click on the Edit option on the Menu bar.
- Now choose Emojis and Symbols. (The keyboard shortcut for Character viewer is Space bar+Control+Command.)
- Type Bullets on the search bar.
- Choose the one you want to use. You will get a few crazy ones like stars, semicircles, and hearts as well.
You can always copy bullets from the online lists or documents and edit them according to your convenience. So these are the various ways to create a bullet on the Mac. If you know any other technique, share it with us in the comment section.