
Asus is one of the most famous laptop and desktop manufacturers. It has lots of models available at different prices for varied purposes. Asus laptops are well designed, and it can even perform the simplest of tasks the best way possible. Just like a smartphone, there may be times where you need to take screenshots on your Asus laptop. Nevertheless, it is a tricky thing, yet some of you require guidelines to capture the screen. There are many ways Asus lets you capture the screen. If you want better clarity, then learn how to screenshot on Asus laptop in detail.
How to Screenshot on Asus Laptop?
To capture a screenshot on an Asus laptop, you shall choose any of the following ways.
Screenshot Whole Screen
There are two methods in which you can screenshot the whole screen of an Asus laptop.
- PrtSc key
- Windows+PrtSc
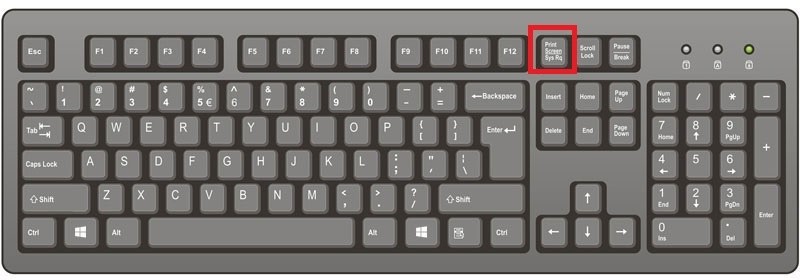
Screenshot Whole Screen using PrtSc
1. Press the PrtSc key to copy the current screen to the clipboard.
2. Then press Windows Key, click on the search bar to find Paint.
3. Click on Paint from the search result to launch it.
4. Now press Ctrl+V keys to paste in on Paint. Sometimes, it saves the file directly on Paint.
Screenshot Whole Screen using Windows+PrtSc
1. While in the active window, press the Windows key and the PrtSc key.

2. This will capture the entire screen and get saved to your Pictures folder on the default device drive.
Related: Learn to capture screenshot on Dell laptop and computer.
Screenshot Whole Asus Laptop Screen & Share it
If you prefer capturing the laptop screen as a whole and share it with others over different social media, then follow the steps.
1. Start by pressing the Windows+H keys to capture the entire screen.
2. When the Windows Share toolbar opens up, you can share it over different apps.
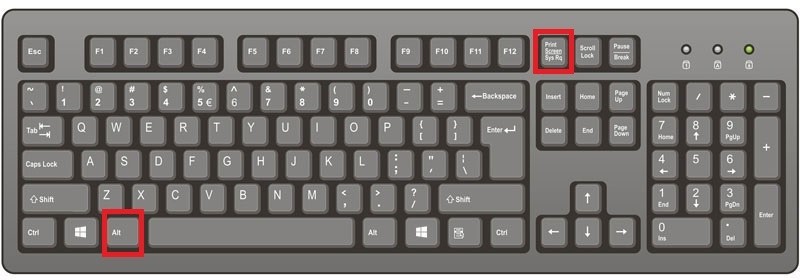
Screenshot Asus Laptop from Active Window
Here are the steps to capture the active window on your Asus laptop.
1. While on the active window, press Alt and PrtSc keys together to take a screenshot.
2. Press the Windows key to search and open the Paint app.
3. Now, press Ctrl+V to paste the screenshot into Paint.
4. Hold Ctrl+S keys to save the screenshot.
Custom Screenshot Asus Laptop
If you want to screen capture a specific portion of the Asus screen, then there are two methods.
- Using Keyboard
- Snipping Tool
Custom Screenshot using Keyboard
1. Press Windows key+Shift+S keys at the same time.
2. Now, click and drag the mouse to select the portion of the screen.
3. Release the mouse button and open the Paint app.
4. Press Ctrl+V keys to paste the screenshot and Ctrl+S to save it.
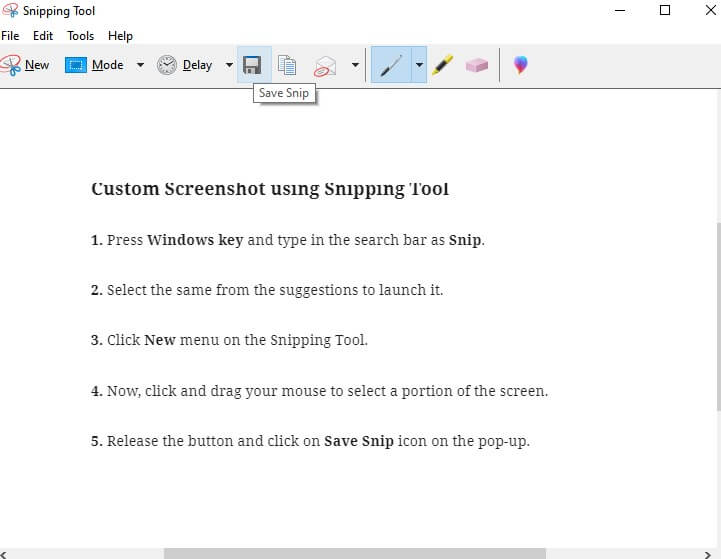
Custom Screenshot using Snipping Tool
1. Press the Windows key to type in the search bar as Snip.
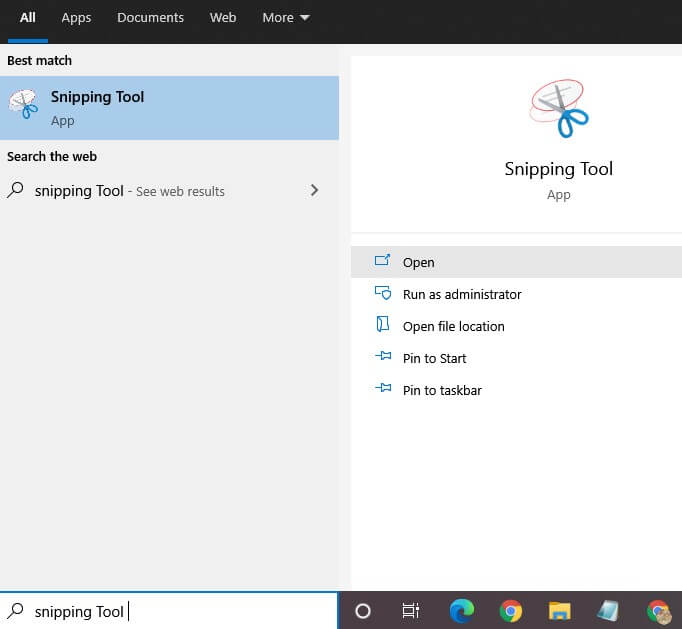
2. Select the same from the suggestions to launch it.
3. Click the New menu on the Snipping Tool.
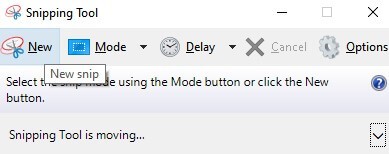
4. Now, you should click and drag your mouse to select a portion of the screen.
5. Release the button and click on the Save Snip icon on the pop-up.
Also Read: How to Take Screenshot on HP Laptop
Bonus! – Take Custom Screenshot using Snagit
Make sure to follow the steps given below to capture the Asus screen after downloading Snagit.
1. Open Snagit app on your Asus laptop and sign in to your account.
2. Tap the Capture button and then click and drag to capture a custom area.
3. Gently release the mouse and then click the Camera icon to capture the custom area.
4. You can further edit your screenshot on the Snagit window if needed.
5. Finally, press Ctrl+S keys to save the screenshot on n Asus laptop.
FYI:
Just like Snagit, Asus laptop users can even use the following apps to capture the screenshot.
- Lightshot
- Schirmfoto
- Jing
That was all about capturing an Asus screen using different methods. Hope that has been a useful session for you. If you find any difficulties, you shall leave us a comment below, and we shall help you out.