
Is Xbox simply a game console? No not at all, it is way more than a normal game console as it does act as a media center. It is one of the most prestigious products for the game lovers launched by Microsoft. As of now, we have seen three variations of the product Xbox console, the Xbox 360, now the most advanced Xbox One which is ruling the market. And we are yet to witness the 4th generation of Xbox called the Xbox X series in November 2020. Xbox offers built-in video recordings but gamers also need a screenshot to show their pride in achievement. So in this article, we are going to discuss how to take a screenshot and save on Xbox One and Xbox 360.
Ways to Take a Screenshot in Xbox
This gadget comes with interesting features like Kinect video commanding, recording, editing your gameplay, and even let you share the same. But many players want to capture their achievements and share as an image. For those users, the Xbox one allows capturing screenshots easily.
- How to take a Screenshot in Xbox One
- How to take a Screenshot in Xbox 360
How to take a Screenshot in Xbox One
Unlike Xbox 360, Xbox one comes with an in-built Screenshot capture feature. Recently Microsoft added this feature in an update to Xbox One. So just make sure that Xbox One is up to date.

Remember you cannot capture Screenshot of the dashboard or any other streaming services like Netflix and Prime Video on Xbox. The screenshot can be taken only while playing a game.
Step 1: Check for update
Mostly there will be frequent prompts to update. If not you can check for updates in Settings >> System >> Update Console. Follow the on-screen instructions to finish the update.
Step 2: Capture Screenshot
Play your favourite game. If your Xbox One is up to date with Kinect Voice detection then all you have do is a voice out “Xbox, Take a Screenshot“.

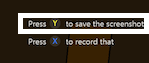
If your Xbox One doesn’t have such features then don’t worry. Double-tap Xbox button on the game controller. Now a screenshot menu will appear. Now tap or press the “Y” button to capture the Screenshot.
In either way suggested above, the Xbox will capture the present screen and save it in the Screenshot folder automatically.

To view the captures, press the View button and scroll down to Capture Options >> Manage Captures. Then on the manage capture screen, press the A button. Select the screenshot and press the “A” button and it uploads the image to Onedrive.
How to Take a Screenshot in Xbox 360
As of now, in Xbox 360 the Screenshot feature is not rolled out yet. So in order to take a screenshot in Xbox 360, connect it with a computer and use the computer’s built-in or a reliable snipping tool software to capture the moment. The following are the steps to take a screenshot in Xbox 360.

Step 1: Set up Xbox
So the first thing you have to do is connect your Xbox to the computer or Laptop with the help of an HDMI cable or RCA cable. Before that make sure your PC has got a Vector graphics card that supports the Xbox console.
Step 2: Screenshot Software
Mostly all the latest PCs come with an in-built Screenshot snipping tool by default. If not you can download any reliable software on your computer and install it.
Step 3: Play
Now Xbox and computer will be in sync. After the connection start playing your favorite Xbox game on your PC.
Step 4: Take Screenshot
Keyboard
There are a few short-cut keys to take screenshots based on the software you are using. Some will capture when you press the “Print Screen” or it will be “Windows + Print Screen” or “Function + Print screen”. Use the one that suits your case.
Or using mouse
Open the snipping tool app from start and click capture screenshot or camera icon. Select the area which you would like to capture and press Enter.
After that you can save it by using Ctrl+S or File>>Save/Save as the capture by choosing the folder from the saving window.
Now that you know how to capture screenshots. Enjoy sharing your achievement with your friends. And don’t forget to leave your comments.