
The screenshots on the computer can be useful in various circumstances. You can use them to teach someone how to do something or save something that can be used for future references. Steps to capture the screenshot differ concerning the brand, model, or OS installed on your computer. Most probably, all the methods will look similar. There might be small changes in key combinations or the command. Here, we will discuss the procedure to take a screenshot on Lenovo computers.
How to Take Screenshots on Lenovo Computers
There are three common ways to take a screenshot on Lenovo laptops and computers running on Windows OS:
- Using Print Screen Key
- Using Snip and Sketch
- Using the Snipping Tool
Using Print Screen Key
- If your laptop or the keyboard connected to your Lenovo computer has a print screen key, press it to capture the full screen.
- The image will be copied to the clipboard.
- Open the paint app and paste the screenshot (CTRL + V).
- Save the file to your desktop or laptop.
Related Guide: 3 Easy Ways to Take Screenshots on Chromebook
You can also use the keyboard combination of (Windows + Print Screen) to capture the full screen. While using this method, the image will be stored automatically under the Pictures >> Screenshots folder.
Using Snip and Sketch

- On the search bar, type ‘Snip and Sketch‘ and launch the app. You can also use the shortcut of Windows + Shift + S keys.
- A toolbar will display four different screenshot modes.
- Rectangular
- Freeform
- Fullscreen
- Windows Snip
- Choose the option that you want and snip the screen.
- Tap taking the screenshot, and a notification will appear on the screen.
- Tap it, and the image will open on the Snip and Sketch editor.
- Now, you can save the image on your device.
Using the Snipping Tool
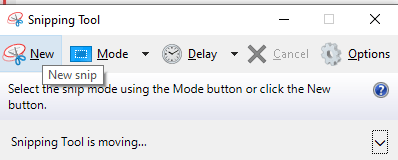
- Launch the Snipping Tool on your Lenovo computer.
- Click on the New tab and choose the option. You can also choose your preferred screenshot mode.
- Take the screenshot, and the image will open on the editor automatically.
- Now, save the screenshots on your device.
Related Guide: Steps to Take Screenshot on Dell Laptop and Computer
FYI! Microsoft has stopped pushing updates for Snipping Tool, and they had replaced it with a new tool called Snip and Sketch (mentioned in the second method).
If you’re a Lenovo Chromebook user, press the Control + Windows Switcher keys to take the screenshot. Still, having queries on taking screenshots on Lenovo computers? Write to us in the comment section and clear your queries.