
For a simple yet powerful browser experience for users accessing Chromebook, enable developer mode on Chromebook to access the full potential. Enabling developer mode allows you to access the full functionality, indeed it is a made for developers. There are some drawbacks and disadvantages while enabling the developer mode on Chromebook. Many developers use this mode to side-load the apps that enable root access on your mobile device. Now, let’s discuss the drawbacks, enable, and disable methods one by one.

Disadvantages/Drawbacks of enabling Developer Mode
#1 By enabling the developer mode there are some potential risks and issues that occur during modding and tinkering with the developer mode. Due to the secured OS goes away and no protection is guaranteed on this mode.
#2 The developer mode is not officially recognized or supported by Google, or OEMs and hence, there are warranty issues that can be risky for an average user.
#3 Wiping your data during working out on developer mode is a huge task. That’s a pretty inconvenience doing this process at the time of enabling and disabling the developer mode.
#4 There will be a slow functioning process during enabling the developer mode it also shows the warning screen. You also need to do continuous backups while working on an essential project or else you’ll lose all your data.
Enable Developer Mode on Chromebook
You may lose all data which cannot be restored hence, ensure that you’ve backed up and saved all the important files, and information while enabling developer mode.
[1] Turn on your Chromebook.
[2] Press and hold the Esc, Refresh keys, and Power button simultaneously.
[3] When the Chrome OS is damaged or missing. Please insert a recovery USB stick or SD card message that appears on the screen during recovery mode.
[4] Press and hold Ctrl + D keys simultaneously.
[5] Press Enter and wait for the device to restart and boot up to developer mode.
[6] Finally, press Ctrl+D again to restart successfully.
Now, access your Chromebook in developer mode. Let’s try out another alternative method without using any keyboard shortcuts. This will also be done in quick few steps.
Enable Developer Mode [Alternative Method]
[1] Launch Chrome.

[2] Select the three vertical dots (Options) button.

[3] Scroll down and click on Settings.

[4] Select About Chrome OS.

[5] Click on More info.

[6] Hit the Change Channel option.

[7] Choose Developer – unstable.

[8] At the bottom right corner, select the Change channel button.

[9] Click the Restart button.

To configure some settings on developer mode and to enable some new things, navigate to chrome://flags when your Chromebook reboots. There is another method called debugging feature that is a bonus part for users that gives you some useful features of developer mode. If you’re enabling it for the first time you’ll see the set-up wizard.
Enable Debugging Bonus
[1] On the set-up wizard, click on Enable debugging features then proceed to the Ctrl+D button.
[2] Click on Enable button.

[3] On the welcome page, click on Let’s go.
[4] Now, click on Accept and Continue by agreeing with the Google Chome OS Terms.
[5] To update select your wireless internet connection, if you’re using wireless internet.
[6] Next, sign in again with your Google credentials.
Sometimes to avoid the accessibility of developer mode you’ve to disallow the feature by performing a few steps. Students and clients possibly get into this extension which is harmful hence for safer situations disable this mode.
Related: How to Rotate Screen on Chromebook
Disable Developer Mode [Chromebook Management]
[1] Go to Google Admin console and access your workspace.
[2] Navigate to Devices > Chrome > Settings > Users & Browsers.
[3] Choose the correct OU to disable the developer mode setting in the OU.
[4] On the right-hand side under the User & Browser settings, find the User Experience section.
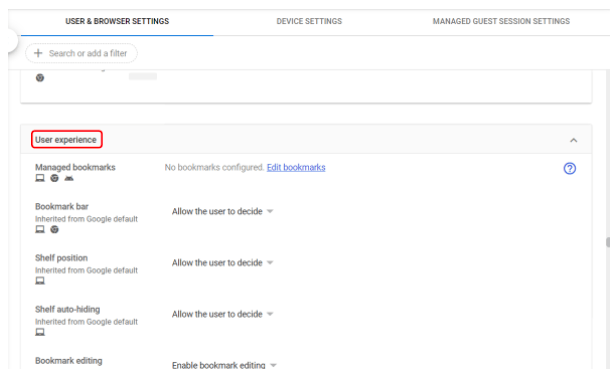
[5] Select Developer Tools in the User Experience settings.
[6] Choose the suitable option from the given options “Always allow the use of built-in developer tools” and “Never allow the use of built-in developer tools”.
[7] Here, we want to disable and don’t want to use the built-in developer tools so select the “Never allow the use of built-in developer tools option” and click on the Save button at the top right corner of the screen.
Turn off Developer Mode on Chromebook
You can turn off the developer mode easily via the root shell by using a few keyboard shortcuts.
[1] Open the Chrome browser and press the Ctrl+Alt+T keys to launch the terminal.
[2] Type shell
crossystem disable_dev_request=1 ; reboot

[3] After typing these commands hit the Enter button
[4] Your Chromebook restarts and booted into a normal mode where you can set it up as usual.
Turn off Chromebook developer mode [Alternate Method]
[1] Turn off your Chromebook completely and turn it on again you’ll see a warning message at the time of booting.
[2] Press the Space button to enable the OS verification and then follow the on-screen instructions.
[3] Within some time you’ll shift from the developer mode to the normal mode.
This is another simple way to turn off developer mode. Now, let’s move on to the FAQ section then wind up this article for more clarification comment below and send us feedback.
Related: How to Enable Dark Mode on Chromebook
FAQ
Press and hold the Escape+Refresh+Power buttons for a few seconds. On the Chrome OS recovery page, you’ll see a USB stick at the same time press Ctrl+D. This will launch the Dev mode screen now press Enter. Performing this you’ll wipe away all the plugins.
Go to Settings > Tap the back icon (U-turn to the left icon) > Tap Developer options > Configure the options and hit the Save.