
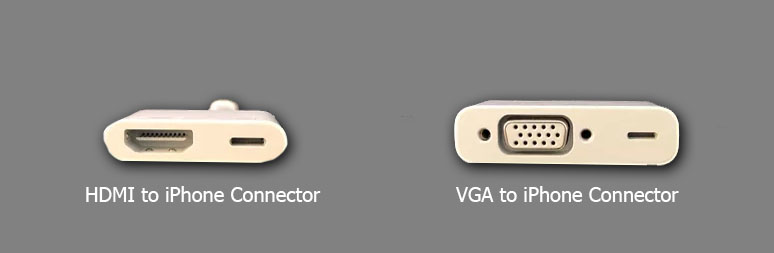
The iPad is simply an excellent device to use. It is compatible with most apps like iPhone yet features a much bigger screen for a better viewing experience. It has many features that make it very attractive for daily use. If you know how to connect iPad to Projector, you can efficiently share the screen with a group of audiences. It may be for a simple entertainment purpose like watching a movie with your friends and family, or it might be a totally different scenario, like making a presentation in front of your colleagues. To connect your iPad with a projector, you need a USB-C to HDMI connector or Lighting to HDMI if you have an older iPad. Some of the older projectors don’t have an HDMI slot and only support VGA. In that case, you will need a USB-C/Lightning to VGA connector.
How to Connect iPad to Projector
Check out the possible ways in which you can connect your iPad with the projector from the below section.
Connecting an iPad to a Projector using a Connector
Note: Make sure you have the right connector and cable. It totally depends on your iPad and Projector. If you are not sure what cables are suitable for your devices, search for them on the internet.
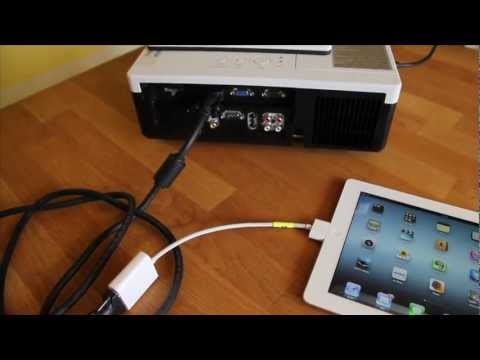
1. Hook up your devices. Connect your iPhone to the projector cable using your connector. Then connect the cable to the projector.
2. Turn on the devices. Once you turn on both the iPad and the projector, the projector automatically will recognize the iPad and will start projecting the screen.
3. Change the projector’s settings if your projector is not picking up your iPad even after a few minutes. It again depends on the projector UI. You shall look for the buttons to change the Input Source and set it to the slot you have connected your iPad to (HDMI/ VGA).
Related: 12 Best iPad Apps for Toddlers & Kids | Fun Learning
Connecting an iPad to a Projector Wirelessly
To connect an iPad to a Projector Wirelessly, you will need the help of an Apple TV device. This way, you can use airplay to share your iPad screen.
1. Connect your Apple TV device to the Projector the same way you connect it to a TV using an HDMI cable. Now, Turn on both devices. Your Projector will start displaying the Apple TV screen.
2. Connect your Apple TV device and your iPad to the same Wi-Fi network.
3. Now, launch the Control Center on your iPad.

4. Turn on the Screen Mirroring option.

5. From the list of available devices shown, select your Apple TV device.
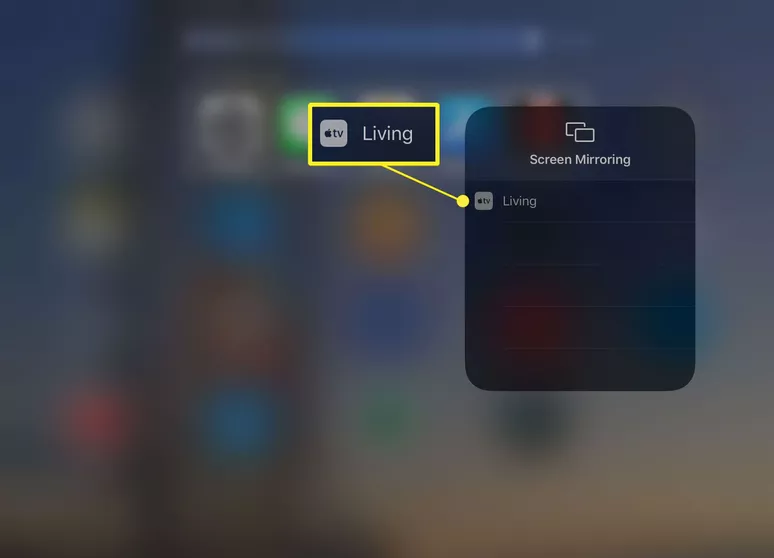
6. It will share your screen with the Apple TV, and you can see your IPad screen on the projection.
Bonus Tip: If you don’t want to share the entire display of your iPad, you can do it using the Airplay feature in the apps. Not all the apps support Airplay. So if you are streaming media content from apps like YouTube, open the video you want to Project, tap the Airplay button on the media player, and choose > AirPlay and Bluetooth devices > AppleTV.
Related: Best Games for iPad Free & Premium Apps You Shall Download
How to Connect iPad to Projector using a Single Cable
Few of the projectors support connecting to the iPad with a cable. You will find a USB-C port on such projectors. With the help of a USB-C lightning cable, you shall connect the iPad to a projector. To make the projection bigger, you shall move the device further away from the surface to which you are projecting.
Note: Those newer iPad models require a cable with USB-C ends.
You shall project videos, slideshows and mirror the screen by connecting your iPad to a projector. It opens up the possibility of letting many users simultaneously see what you want to show them in one place. Hope this article answered all your questions on Connecting iPad to Projector.