
In this tech era, you got to protect everything. All our activities are tracked and traced by ISPs, or hackers, or even by some individuals. Thus, sending an email attachment is prone to more risks. It would be even worse if the email attachment contains sensitive information. There is a high chance for anyone in the middle to intercept it. So it is essential to protect the email as well as the email attachment. The first step while sharing the password-protected email is to create a password-protected file. From this article, you will learn to password protect an email attachment.
Password Protect an Email Attachment on Outlook
To password protect an Email attachment on Outlook, you need to install S/MIME on your system.
Step 1: Open the Outlook app on your system. Then click on the File Ribbon.
Step 2: Now select Options. And go to Trust Center Settings.
Step 3: Choose Email Security. And go to the Encrypted Email section.
Step 4: Now, choose Settings. Then go to Certificates and Algorithms.
Step 5: Choose S/MIME. Then click OK.
Once after enabling these features, you can encrypt your email.
Step 1: Compose a mail as usual. Then choose the Options tab.
Step 2: Choose Encrypt and then select Encrypt with S/MIME.
Password Protect an Email Attachment on Gmail
Gmail offers a confidential mode to send and receive confidential emails. There are few limitations though the recipient can easily forward, copy, print. But then the download option is disabled. This will prevent the recipient from accidentally sharing the Emails.
Caution! Using Confidential mode on Gmail doesn’t restrict you from taking screenshots or photos of your message or attachments. If the recipient has got a malicious program on their system, they can even download the message or attachment.
Compose Confidential Email on Gmail (Computer & Smartphone)
Step 1: Open Gmail and make sure you have logged into your account. As usual, click Compose.

Step 2: Click on the Turn on Confidential mode on the bottom right corner. A lock icon with a clock on it.
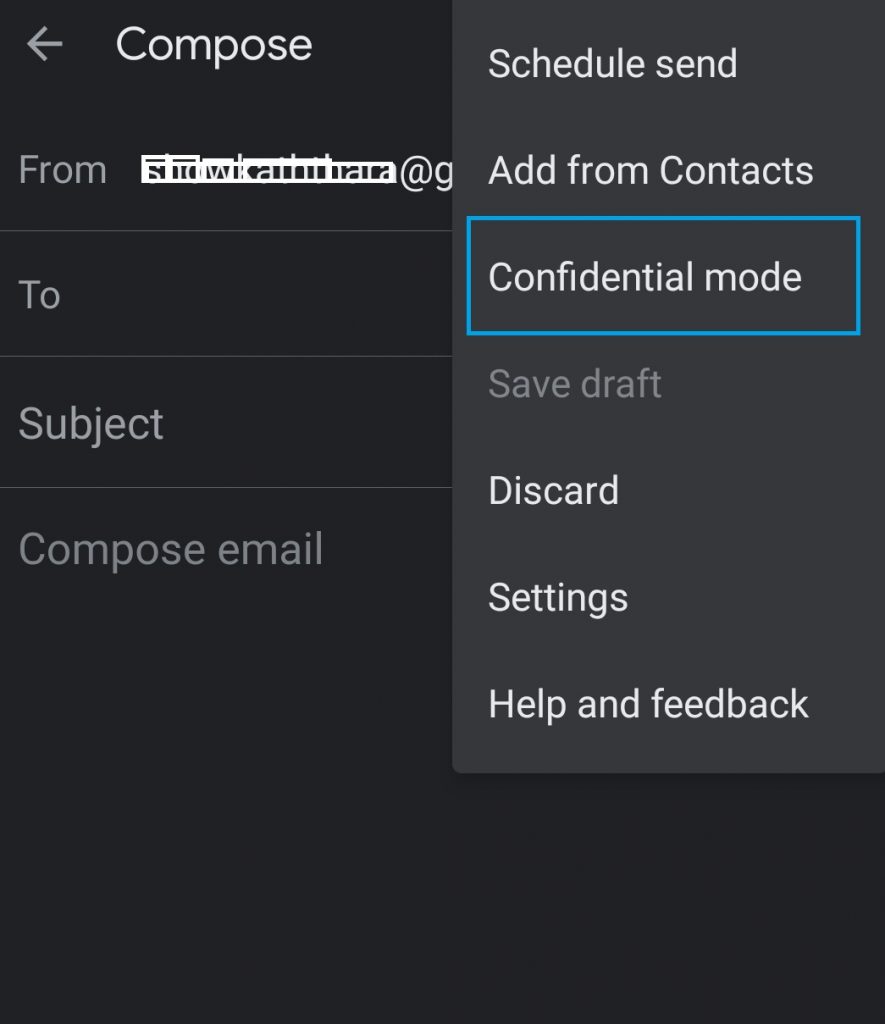
- On the Gmail app, tap the three-dotted menu option on the right corner of the mail composing page. Then choose Confidential Mode and Turn it on.
Step 3: Set an expiration date and passcode.
- 1) If you choose “No SMS Passcode,” then the non-Gmail recipient will get emailed a passcode, and Gmail users have direct access to the mail.
- 2) If you choose “SMS Passcode,” the recipient will receive the passcode. Make sure to enter the recipient’s mobile number correctly.
Step 4: Click Save or Done.
If you want the receiver not to access the mail before the expiration date, you can remove the access. Choose the Sent items from the left panel, Open the confidential mail and click Remove access.
Bonus! Password Protect an Attachment
There are various attachments that we will send in an Email. It covers word documents, PDFs, images, videos, etc. Images can be converted as PDF and protected with a password. For videos and other stuff, you have to go for a drive or any such options.
Note: The below methods will help you password protect any attachment before adding it to your email.
1. Password Protect a Word Document
Step 1: Open the document which you would like to protect with the password.
Step 2: Click on the File tab on the Menu bar.
Step 3: Then choose Info from the options you get.
Step 4: Now, select Protect Document. Then choose Encrypt with Password.
Step 5: In the provided text box, type the password. Click OK.
Step 6: When asked for confirmation, type the same password. Click OK.
Step 7: And that’s it. You can attach the document in the mail. Then send it.
2. Password Protect as PDF Documents

Step 1: Open the document. Then go to File >> Save as.
Step 2: Choose the Save File option as a PDF.
Step 3: Now, click on the More Options. Then choose Options.
Step 4: Choose the Encrypt document with the Password option.
Step 5: Enter the password. Confirm it and click OK.
Step 6: Compose the Email and attach this file.
Related: How to Delete All Emails From a Sender
3. Password Protect WinZip
Step 1: Download WinZip software. Then install it.
Step 2: Now, choose the document you want to open.
Step 3: Right-click on it and choose Open With.
Step 4: Then, choose WinZip from the options or choose WinZip. And then choose to Add to WinZip.
Step 5: Then check the box “Encrypt added files“. Then click the Add button.
Step 6: Type the password. Then confirm it. And click OK.
Step 7: Compose the email. Send this file as an attachment.
4. Password Protect 7Zip

Step 1: Download the 7Zip on your computer. Launch the software.
Step 2: On the file manager, choose the file you want to add.
Step 3: Click and choose the file. Then choose Add.
Step 4: On the Add to Archive window, choose the archive format as “zip.” You can select it from the drop-down box.
Step 5: Now check the Encryption method. That will say ‘AES-256’.
Step 6: Enter the password. And re-enter it for confirmation. And click OK.
Step 7: Open the mail and attach the file.
5. Password Protect Using In-Built File Encryption
Note: This method is for Windows XP, 7, 8, and 10.
Windows XP
Step 1: Choose the file. Right-click and choose Send to.
Step 2: Then, choose the Compressed Zipped folder. A folder will open.
Step 3: Open the folder. Now click on the file.
Step 4: Then, choose to Add a Password.
Step 5: Type the password. And then re-enter it to confirm. Click OK.
Step 6: Compose the email and attach this.
Windows 7, 8, and 10
Step 1: Right-click on the file name. Choose the Properties option.
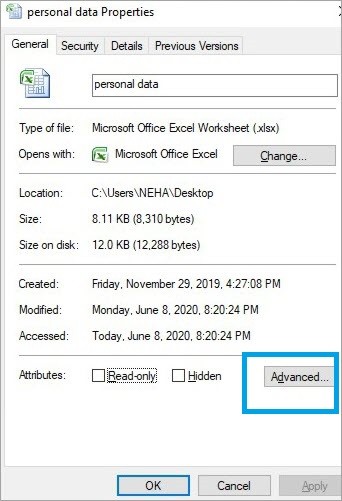
Step 2: Click on the Advanced tab.

Step 3: Now check the box near Encrypt contents to secure data.
Step 4: Then click OK. And then click Apply.
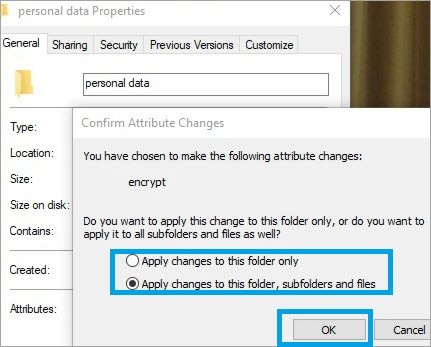
Now, Windows will ask whether to encrypt the file alone or to encrypt the whole parent folder. Choose the one you want. Now the file will be locked. If you choose the whole folder, all the files will be encrypted, and even if you add new files, those will be encrypted.
6. Password Protect an Email Attachment in Mac
Step 1: Choose the file. Double click on it.
Step 2: The document will open in the Preview app.
Step 3: Now, click on the File. Then choose Save.
Step 4: Choose the encrypt box.
Step 5: Enter the password. And confirm it and Save.
Step 6: Compose the email and attach the file.
Alternative Ways
- To protect the image, save it as a PDF. And follow any one of the above-suggested methods.
- There are various online services and apps to help you with this.
- But then sometimes you are at risk. So be careful. And use a reliable way.
- You can also save the document on your drive. Then send the link to the receiver. Once sent, the receiver has to request you for access. Check for the same and grant access.
- You shall choose any of the third-party encryption tools like
Note: The software will add an extension near the Send button. With which you can perform end-to-end encryption to the Gmail files.
Finally, send the password in different emails. Or convey it to them in person or by phone. It will ensure safety. By the way, do not forget to give us feedback in the comment section below.