Summary
- You can get dynamic island on an Android phone using the Dynamic Spot app.
- Dynamic Spot app is available in the Play Store on Android mobiles.
- Install Dynamic Spot: Open Play Store → Search for Dynamic Spot → Select the app → Click Install.
On September 2022, Apple launched its new iPhone 14 series with many features. One of the best things about the iPhone 14 series is Dynamic Island. This Dynamic Island is only available in the iPhone 14 Pro series (iPhone 14 Pro and iPhone 14 Pro Max). The dynamic island is a notch that lies separately on the top of the screen. The dynamic island changes its size and pops out whenever the user receives a notification or alert. In addition, it also displays size variation while interacting with some apps. Currently, several Android mobile brands started to develop smartphones with Dynamic Island. Until the official release, you can install a third-party app called Dynamic Spot to enable dynamic island on your Android phone.
Dynamic Island on Android: Pros and Cons
| Pros | Cons |
|---|---|
| Multitasking. | More battery consumption |
| Access Notifications easily. | Overheating issues. |
| Customization options. | The selfie camera may get damaged due to over-touch. |
| Supports messaging, music, and timer apps. | Full-screen videos are affected. |
| Attractive Notch. | Dynamic Island looks bad in direct sunlight. |
| Open the app with a single tap. | It cannot be used in Android 8 or below. |
How to Install Dynamic Spot on Android Device
(1) Launch Google Play Store on an Android mobile.
(2) Navigate to the search bar and enter Dynamic Spot using the virtual keyboard.
(3) Look for the Dynamic Spot app in the search results and click it.

(4) Hit the Install button on the app description page.

(5) Now, the application will be installed on your Android device.
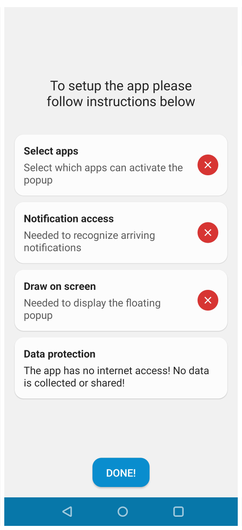
(6) Launch the Dynamic Spot app and set up the app by enabling all the required functions. Then, tap Done.

(7) Click on the option Popup Settings. Here, you can customize Dynamic Island on your Android device.
(8) If you want Dynamic Island to display in the lock screen, tap the toggle button next to the option Show on lockscreen.

(9) Select Dimensions to customize the size of the dynamic island.
- Offset position Y – To adjust the height of the dynamic island ( ↑↓ ).
- Offset size X – To adjust the width of the dynamic spot ( ←→ ).
- Offset size Y – To adjust the slanting position of the dynamic island.
- Edge rounding – Adjust the Edge rounding to get the clear shape of your dynamic island.

(10) Now, you will see the Dynamic island popping out whenever you receive a notification.
Other Android Phone Guides:
- Best Launcher for Android Smartphones.
- Best Keyboard Apps for Android Phones.
- Best VR Apps for Android Smartphones.
- Best Browsers for Android Phones.
Frequently Asked Questions
No. Android phones do not have Dynamic island support. You need to install a third-party app like Dynamic spot to get dynamic island on Android devices.
Dynamic Island – iOS 16 (GriceMobile) and Dynamic Island Pro – Notch (GEO SOFTECH) are the best alternatives for Dynamic Spot.

